Ember Components in brief - Ember.js Tutorial part 6
Wed Dec 14 2016
Paul Shan
I’m using Ember 2.10.0 here.
After completing how to scaffold, template syntaxes, ember objects and routers in our Ember.js tutorial series; today in part 6 I will talk about one of the most important things in ember (even in front end programming); i.e. components.
Ember.View & Ember.Component
Before ember’s version 2.0, there used to be a View class (which is currently deprecated). There used to be a route which used to have it’s controller and under the controller there used to be view instances. A view used to have a template to render and it could also access the controller. The components of ember 2.0 are pretty similar to the Ember.View. The life cycle and methods etc are pretty similar, but unlike View, ember Components are isolated. It has a template for it and the actions triggered from the template is passed to the component object, but it doesn’t have or can access a controller and it doesn’t have a context. All data needs to be passed from outside.
Defining and using components
Though we can continue by using any other routes which we’ve created in last articles, but let’s create a fresh route and use a new component. So I will create a route named my-component-route and a component named student-details-component. Use the two commands below.
$ ember generate route my-component-route
$ ember generate component student-details-component
The first command will generate a route named my-component-route.js along with a template my-component-route.hbs. The second command will generate a component in app/components/ named student-details-component.js and a template for that with the same name in app/templates/components/.
First of all let’s provide the route (actually the controller) with a model. As I said we will cover Ember.Data in our upcoming articles, so now we will use simple object as model. Below is the code for my-component-route.js.
my-component-route.js
import Ember from 'ember';

let myModel = [
    {
        firstName: "Jack",
        lastName: "Bauer"
    },
    {
        firstName: "David",
        lastName: "Palmer"
    }
]

export default Ember.Route.extend({
    model(){
        return myModel;
    }
});
So the route is returning an array of students as model. Now let’s modify our student-details-component.js component as below.
student-details-component.js
import Ember from 'ember';

export default Ember.Component.extend({
    firstName: null,
    lastName: null,
    fullName: Ember.computed('firstName', 'lastName', function () {
        return `${this.firstName} ${this.lastName}`;
    })
});
Here we’ve added two properties firstName and lastName which we will provide from outside; and a computed property fullName. Now let’s code for the template of this component which is student-details-component.hbs.
student-details-component.hbs
{{yield}}
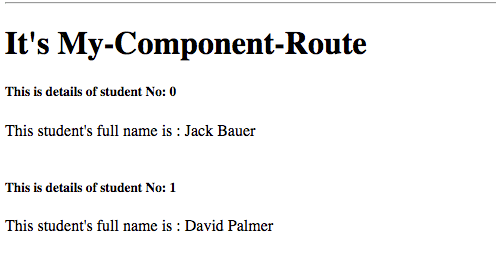
This student's full name is : {{fullName}}
So here, we’ve printed the fullName computed property that you can see. Just one line above that we’ve added a {{yield}} helper. This is kind of a placeholder whose html will be provided by the template which is using this component. I think after you see the my-component-route.hbs which is the template for our my-component-route route, you will have a better understanding of that {{yield}}.
my-component-route.hbs
It's My-Component-Route
{{#each model as |student index| }}
    {{#student-details-component firstName=student.firstName lastName=student.lastName}}
        This is details of student No: {{index}}
    {{/student-details-component}}


{{/each}}
In this code, first of all we’ve iterated the model, which we supplied in the router. Inside the {{each}} we’ve placed our newly created component student-details-component with two properties firstName and lastName provided from the model object. These two properties has been binded to the component’s firstName and lastName properties which helped to calculate the fullName property. The line This is details of student No: {{index}} is placed inside the component, so it will appear in the place where {{yield}} was used.
So if you run the ember app now, and navigate to localhost:4200/my-component-route you will find the following output.
More how to’s of Ember components
How to pass data/property to the component
By the time you’ve already come to know, I think, about how to pass data or property to a component as the example above of my-component-route.hbs showed it. Yes, this is one way to pass the data. In this case you you are passing the properties as attribute of that component. However you can also send parameters basing on positions. Below is how to do it.
my-component-route.hbs
It's My-Component-Route
{{#each model as |student index| }}
    {{#student-details-component student.firstName student.lastName}}
        This is details of student No: {{index}}
    {{/student-details-component}}


{{/each}}
student-details-component.js
import Ember from 'ember';

let studentDetailsComponent = Ember.Component.extend({
    firstName: null,
    lastName: null,
    fullName: Ember.computed('firstName', 'lastName', function () {
        return `${this.firstName} ${this.lastName}`;
    })
});

studentDetailsComponent.reopenClass({
    positionalParams: ['firstName', 'lastName']
});

export default studentDetailsComponent;
As you can see here, we passed the firstName and lastName as first and second parameter and then made the component to accept them using the property positionalParams. If you notice carefully, you will find I’ve put the positionalParams property in .reopenClass. The reason is, positionalParams is a static property to the class and can not be altered at runtime.
yield - the content wrapper
Yes you know about how {{yield}} works. We’ve used just a while ago. The content which you write inside the block of a component will appear in the {{yield}} part of that component. However if you do not have the necessity of {{yield}} or need of passing content, you can skip the # and the closing tag; and use your component as below.
{{student-details-component firstName=student.firstName lastName=student.lastName}}
Accessing component properties from wrapped content
You can also access any property which is defined inside your component from the wrapped code you’ve written. All you need to do is, pass that variable via the {{yield}} and hash helper; and using a as while implementing the component. Below is an example.
student-details-component.hbs
    {{yield (hash fullName=fullName)}}
    This student's full name is : {{fullName}}
partial of my-component-route.hbs
    {{#student-details-component editStyle="markdown-style" firstName=student.firstName lastName=student.lastName as |student|}}
        This is details of student No: {{index}}
        By the way, I know the fullName is {{student.fullName}}
    {{/student-details-component}}
Component elementName, attributes and class
If you check your DOM, you will find a Component’s output is always a div with a class=elber-view and no attribute. But ember provides you way to do more on these three.
element name
Changing the element name from div to something else (let’s p) is easy. The components has a property named tagName. You just need to override the value of it.
import Ember from 'ember';
export default Ember.Component.extend({
  tagName: 'p'
});
attributes
This is also easy. Hope just the example is enough to explain it.
import Ember from 'ember';

export default Ember.Component.extend({
  tagName: 'p',
  title: "Void Canvas",
  attributeBindings: ['title'],
});
The above code will result into following html.
class
There are couple of ways to provide className to your component. The easiest one is, while using it, you can directly give the class.
{{my-component class="my-dashing-class"}}
The second way is to provide the value of the property classNames as an array of strings inside the component.
export default Ember.Component.extend({
    classNames: ["my-dashing-class"]
});
In both the above cases it will add the my-dashing-class class in the DOM.
You can also add conditional classes. To do that you need to use the property classNameBindings. Below is an example.
export default Ember.Component.extend({
    classNameBindings: ["myDashingClass"],
    myDashingClass: true
});
It will automatically convert the camel case to dash case and myDashingClass will become my-dashing-class in the DOM and it will only appear if myDashingClass property is true.
You can even bind the classNames like if else statements. Below is an example.
export default Ember.Component.extend({
  classNameBindings: ["shouldIDisplay:myDashingClass:yourDashingClass"],
  shouldIDisplay: true
});
If the property shouldIDisplay is true, it will add the class my-dashing-class in the DOM element, else your-dashing-class will be added.
DOM event handling
As components are the actual guys who will interact with the end user; and user interacts with events like click, doubleClick, drag etc etc. So for DOM events ember’s components have conventional hooks. I am adding a doubleClick() event on out student-details-component.js
import Ember from 'ember';

export default Ember.Component.extend({
    firstName: null,
    lastName: null,
    fullName: Ember.computed('firstName', 'lastName', function () {
        return `${this.firstName} ${this.lastName}`;
    }),
    doubleClick() {
        alert("Hey! How dare you click me?");
    }
});
Now if you double click on the component’s output in the browser, you will find the alert coming up. Just like doubleClick you can also use any of the following events.
- touchStart
- touchMove
- touchEnd
- touchCancel
- keyDown
- keyUp
- keyPress
- mouseDown
- mouseUp
- contextMenu
- click
- doubleClick
- mouseMove
- focusIn
- focusOut
- mouseEnter
- mouseLeave
- submit
- change
- focusIn
- focusOut
- input
- dragStart
- drag
- dragEnter
- dragLeave
- dragOver
- dragEnd
- drop
You can also separately bind an action with any event. Below is an example.
export default Ember.Component.extend({
    firstName: null,
    lastName: null,
    fullName: Ember.computed('firstName', 'lastName', function () {
        return `${this.firstName} ${this.lastName}`;
    }),
    actions: {
        myClick(){
            alert("Oh! you clicked me.");
        }
    }
});
In the template also there will be a change.
    {{yield}}
    This student's full name is : {{fullName}}
Component life cycle
Components are useful because they are completely isolated and due to there life cycle hooks, you know exactly when they are rendered and after that you can do anything with that piece of DOM. This gives you the power to control each part of the DOM through components. Below are the life cycle hooks of components.
Hooks
init(): This hook will be called at first. It’s just like constructor of your component class.
didReceiveAttrs(): This hook is called after the init, when the component’s properties are updated with the provided attributes. Both in case of first render and re-render due to attribute change this hook will be called.
willUpdate(): Will be called once the component is going to update itself. It will just be called in case of update and not on initial render.
willRender(): Both in case of first and re-render this hook will be called just before the rendering starts.
didInsertElement(): When the component is rendered to the DOM for the first time, this hook will be called.
didUpdate(): Will be called once the component has updated itself. It will just be called in case of update and not on initial render.
didRender(): After every render, be it the first one or the re-render, this hook will be called. Remember in case of first render it will be called after didInsertElement.
willDestroyElement(): As the name suggests, it will be called when the component is going to be destroyed. A component can be destroyed once you leave a route or due to if else conditions in the template.
willClearRender(): Called when the component is about to re-render, but before anything has been torn down. This is a good opportunity to tear down any manual observers you have installed based on the DOM state.
didDestroyElement(): Called after the component is destroyed.
Next part
So you are able to use components too now. Congratulations for that. In the next part of this Ember tutorial series, we will see what is Ember data and how models work.
SHARE THIS ARTICLE


Popular Articles
Authentication using Google's oAuth api with node.js
Thu Mar 10 2016
OAuth authentications are pretty popular now a days and another thing which is popular is JavaScript. This article shows how to plugin google’s oAuth api for authentication in your own node application.CSS3 Loader Snippet Collection: (Part 2 - Squares)
Sat Mar 01 2014
This is a continuation of my CSS3 loader snippet collection series. I've provided spinning css3 animation loader in the part 1 of this series and here in part 2, I'm providing various square type loading