Hello world with raspberry pi & nodejs : IoT with JS
Wed Apr 11 2018
Paul Shan
Today onwards we are going to introduce the category IoT in VoidCanvas; where you will find how to play with IoT (internet of things) devices using JavaScript.
As the first article of this series, we will tell you how you should get started.
What is IoT?
IoT is a network of physical things or devices who can communicate with each other and exchange data. These devices are enriched with sensors, electronic components and softwares.
For an example, I do control my house lights and water pump with my mobile now. So; my mobile is a device, which has an app where I give my input and then the mobile passes information to the raspberry pi in my house, which controls a relay switch via which my electric bulbs are connected.
So the devices are communicating and finally getting something done together. This is called internet of things or IoT.
Prerequisite
- Knowledge of Node.js
- Raspberry pi
- Power supply of raspberry pi
- SD card of minimum 8 GB
- Ethernet cable (one time use)
- Wifi
To start writing your first node.js program in raspberry pi, you obviously need a raspberry pi first with its power supply (5v, 1 to 2 amp). An SD card is needed to install an operating system for the raspberry pi and store your node.js codes or files.
As a developer I always have a laptop with me and do not use any extra keyboard and mouse. Buying a keyboard and mouse just to setup the raspberry pi is not really a good idea. So I decided to set it up using ssh.
But to make the raspberry talk to your wifi you need to put some code in it and that is why to connect the raspberry for the first time with your router, you will be needing an ethernet cable.
And very obviously as VoidCanvas is a JavaScriptish blog, so we are going to use majorly node.js to communicate with the pi. So a prior knowledge of JavaScript is needed.
Setting up raspbian OS
As Raspberry pi is nothing but a small computer, and computers need an operating system to run applications in it; we also need to install an operating system in it.
Download raspbian OS
Raspbian is rasberry pi’s official operating system.
Though there are NOOBS and other OS, but I will recommend this.
Before start doing anything with the SD card, you should download the raspbian OS on your computer.
Find and unmount the SD card
So, as the raspbian is getting downloaded now, you also get ready with your SD card. Connect the SD card with your laptop. Majority of the laptops these days comes up with built in port. But if you do not have one, you can use an SD card adapter.
Once the SD card is inserted, open the terminal and run the df -h command. This command will list all mounted disks in the Mac, including the newly inserted SD card, and should produce something similar to the following output:
Filesystem      Size   Used  Avail Capacity iused               ifree %iused  Mounted on
/dev/disk1s1   113Gi  101Gi  3.6Gi    97% 2542156 9223372036852233651    0%   /
devfs          197Ki  197Ki    0Bi   100%     680                   0  100%   /dev
/dev/disk1s4   113Gi  8.0Gi  3.6Gi    70%       8 9223372036854775799    0%   /private/var/vm
map -hosts       0Bi    0Bi    0Bi   100%       0                   0  100%   /net
map auto_home    0Bi    0Bi    0Bi   100%       0                   0  100%   /home
/dev/disk2s1     0Mi    0Mi   16Gi     0%        0        0  100%   /Volumes/UNTITLED
For me the SD card is showing as /dev/disk2s1, however in your case it could have been /dev/disk3s1 depending on your disks. Now unmount the same using the command sudo diskutil unmount /dev/disk2s1.
Copy raspbian to SD card
Hope your raspbian download is completed by this time. So now extract that .zip file and you will find a .img file from that. Now we need to copy that in our SD card. Use the command below
$ sudo dd bs=1m if=~/Downloads/your-downloaded-raspbian.img of=/dev/rdisk2
This is going to take time, so don’t panic till 4 to 7 minutes
I have used /dev/rdisk2 in the above command; but if df -h showed you /dev/disk3s1, you need to use /dev/rdisk3 in the above command.
Create ssh file
Now that our disk is all ready to boot; we will put a ssh file into it, otherwise raspbian will not open ssh port by default. To add the ssh file run the command below.
$ touch /Volumes/boot/ssh
Now it’s all set and you can eject the SD card by running the command sudo diskutil eject /dev/rdisk2.
Setup raspberry pi
Now that your SD card is ready to boot after our previous steps, you can now go ahead with the next part which is setting up the pi itself.
Connect the hardwares
So you first need to insert the SD card in your raspberry pi. There is a small slot for it in the bottom side.
Now insert one end of the ethernet cable in the pi and the other end should be in your router. Don’t forget to keep your router up.
Now connect the power cable of the raspberry pi and switch it on. You should be able to see a red colored LED glowing.
SSH into the pi
Now that the pi is booted up, we will make an ssh connection to it. So open up the terminal of your mac (windows users need to have something like putty installed) and run the command arp -a to find the connected devices.
As you can see it is displaying the list of devices connected by the ethernet. If raspberry is the only device connected through ethernet with the router, there will be only 1 legal ip (except the router one which will end with .1 probably).
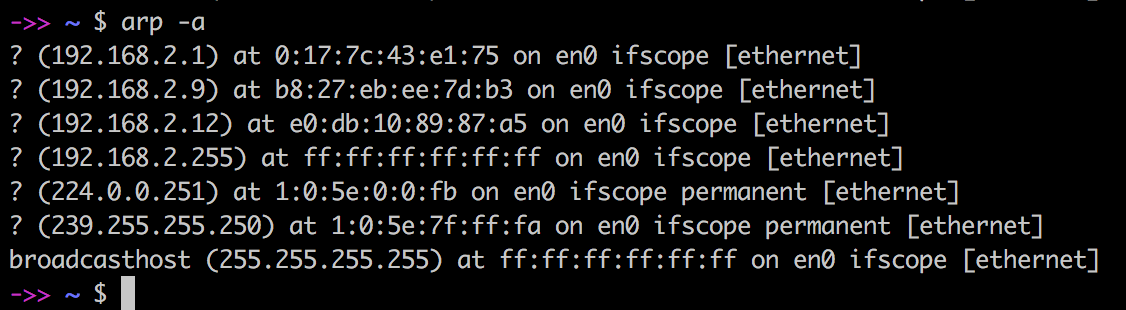
So find that ip and make an ssh connection with the following command.
$ ssh [email protected]
The default PASSWORD of raspbian is raspberry. Insert that to log into the device.
Change password
The first task you should do after making the successful ssh connection is to change the password. Run the command raspi-config to open up the configuration portal. Select change password from the menu and do the needful.

Connect via wifi
The next task you should do is, get rid of find the way to get rid of the ethernet cable. After all placing the device always close to your router doesn’t make sense. Wait, don’t remove it directly, but put your wifi configuration in the file /etc/network/interfaces. Add the following in that file of your raspberry, below the existing code of it (if any). sudo nano /etc/network/interfaces
auto lo

iface lo inet loopback
iface eth0 inet dhcp

allow-hotplug wlan0
auto wlan0

iface wlan0 inet dhcp
  wpa-ssid "your wifi name"
  wpa-psk "your wifi password"
So from next time onwards, you don’t need to connect the pi with the router with ethernet cable. It will automatically get connected via wifi. However as that will be a new connection, the previously assigned ip won’t work anymore. You need to find the new ip. By the way you can use the software nmap to find any ip addresses at your home network. I use it very often for IoT related work.
Install nvm
As we are going to do almost everything in this series with node.js, so we have to install node first (though a basic node version will there there already with raspbian). I recommend using nvm, cause it helps managing the versions.
Now run the following command in your pi, where you have ssh’ed.
$ curl -o- https://raw.githubusercontent.com/creationix/nvm/v0.33.8/install.sh | bash
The command above have a fixed version of nvm, I would suggest to visit nvm doc and find the recent version.
Hello World
After doing all the setups, we are all set to run our first program on our lovely raspberry pi.
So, after following the previous steps you must be ssh’d into the pi. Let’s create a folder and name it first-program.
cd Documents/
mkdir first-program
cd first-program
Let’s create our first program. Run the command nano index.js. The new file will be on your nano editor now. So here the small hello world code.
console.log('Hello World');
Ah, that’s it. Save and come out of that file using ctrl + o and then ctrl + x. And simply run it with node index.js to get your first Hello World printed using the processors of Raspberry Pi.
So, now you know how to setup your raspberry pi for your node.js application. Thanks to this post who helped me with my first raspberry. This is just the first article on IoT with JavaScript in VoidCanvas and we have a lot many things in the pipeline .So stay tuned.
SHARE THIS ARTICLE


Popular Articles
Authentication using Google's oAuth api with node.js
Thu Mar 10 2016
OAuth authentications are pretty popular now a days and another thing which is popular is JavaScript. This article shows how to plugin google’s oAuth api for authentication in your own node application.CSS3 Loader Snippet Collection: (Part 2 - Squares)
Sat Mar 01 2014
This is a continuation of my CSS3 loader snippet collection series. I've provided spinning css3 animation loader in the part 1 of this series and here in part 2, I'm providing various square type loading