Control LED with raspberry pi & nodejs : IoT with JS
Wed Apr 18 2018
Paul Shan
If you are a beginner in IoT (internet of things), one of the very early projects you can do is, lighting up an LED. As we have started using raspberry pi with node js; today we will see how can we light up and control LED bulbs, writing a nodejs program with a raspberry pi.
Prequistics
- A raspberry pi
- A breadboard
- 100 ohm resistance
- 3 colored LED
- Male to female jumper wires
- Knowledge of Node.js
Content of this post
- Pi GPIO understanding & setting
- Simply light up an LED
- Make the LED blink
- Control three colored LEDs
Pi GPIO understanding & setting
One of the most important features of the Raspberry Pi is the row of GPIO (general-purpose input/output) pins along the top edge of the board. There are 40 pins out there in a raspberry pi board, which is like the following.
Raspberry Pi GPIO diagram

The yellow dots can be used either as input or as output pins. In today’s task, we will use them as output to signal our LED.
If you notice properly, they are not in numerical order, the GPIO pins. Things will be more clear once we start writing the actual program.
To know more about them you can visit pi gpio doc.
Setting up breadboard connections
It is always suggested to use a breadboard while developing any raspberry pi project with external components. Cause, it’s easier.
So we are creating a circuit like below, using the GPIO pin 4 and the immediate ground. The pin 4 will be connected to the positive end (longer end) of the LED and the other end of the LED will be connected to the ground via a resistance of 100 ohm.

Simply light up an LED
Now that our circuit is ready in the previous step, we can start writing our program. So first of all we need to enter into our pi. You can either connect your keyboard and mouse to the pi and boot, or connect to the pi via an ssh connection.
Once inside the pi, let us create a folder led-projects and scaffold a node project using npm init command and answering the questions.
After that, we will need an npm package called onoff. So the command series would be like the following.
mkdir led-projects
cd led-projects
npm init
npm i --save onoff
Now that project setup is done, let’s create a file named switch-on.js and open it with nano editor. Paste the code below to that file.
switch-on.js
’use strict’;
const Gpio = require('onoff').Gpio;
const LED = new Gpio(4, 'out'); // gpio 4 as out

LED.writeSync(1); // making the gpio 4 on. Will turn LED on


function switchOff(){
  LED.writeSync(0); // making the gpio 4 off. Will turn LED off
  LED.unexport(); // Unexport GPIO to free resources
}

setTimeout(switchOff, 10000);
Now simply run node switch-on.js and the LED will start shining, for 10 seconds. We have achieved it by simply making the pin 4 on and off. Once the pin 4 is on, the positive end of the LED (which is connected to that pin through the breadboard) gets positive and as the negative end of the LED is already in the ground; it created a current flow and thus the LED is shining.
Make the LED blink
Now that we have successfully switched the LED on, let’s try to blink it. So, what is blinking? Blinking is nothing but changing the state of the LED after a certain period of time, continuously.
If you are familiar with JavaScript, you should have heard of setInterval, whose task is to run a function periodically. So we will use setInterval to periodically making the pin 4 on and off and that should be sufficient to make an LED blink.
So let’s create a new file blink.js with nano and paste the following code there.
blink.js
'use strict';

const Gpio = require('onoff').Gpio;
const LED = new Gpio(4, 'out'); // gpio 4 as out

const timer = setInterval(()=>{
  if (LED.readSync() === 0) { // if current pin state is 0 (off)
    LED.writeSync(1); // make it 1 (on)
  } else {
    LED.writeSync(0); // make it 0 (off)
  }
}, 250);


function switchOff(){
  clearInterval(timer);
  LED.writeSync(0); // making the gpio 4 off. Will turn LED off
  LED.unexport(); // Unexport GPIO to free resources
}

setTimeout(switchOff, 10000);
The code is pretty similar to our previous one. It switches off and exits after 10 seconds. But instead of just making the LED on, it runs a timer with the help of setInterval, which executed on each 250ms and if the LED is on, it makes it off and the vice versa.
Control three colored LEDs
In the previous two examples, we have played enough with switching on and off the LEDs. So let’s take a step forward and control the led with node console.
This time we will have three LEDs; yellow, green and red; and whatever color we write in the node console, the corresponding LED will light up. That’s the target.
Breadboard setup
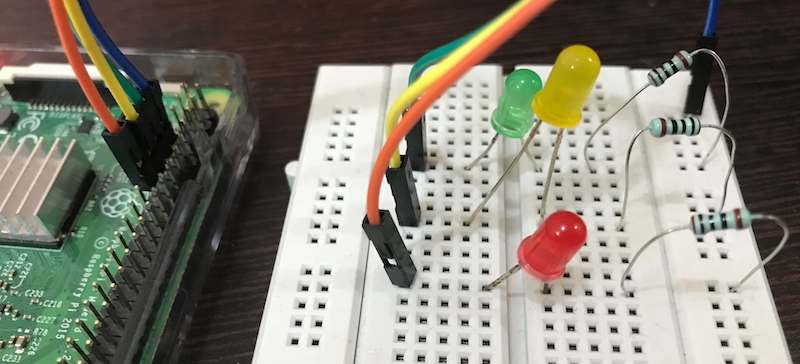 So, this time we have selected the GPIO pins 17, 27 and 22. Green LED is connected to gpio 17, yellow with gpio 27 and red with 22. And all going to a common ground. Remember gpio pins are not in sequential number. We have actually selected physically close pins. Refer the image above.
Node program
Now, as we are going to prompt the user for input, we will need an npm package, named prompt. So let’s install it first using the command npm install --save prompt.
Now that the module is installed, let’s create a file control.js and paste the following code in it.
control.js
'use strict';

const Gpio = require('onoff').Gpio;
const prompt = require('prompt');
const LED_RED = new Gpio(22, 'out');
const LED_YELLOW = new Gpio(27, 'out');
const LED_GREEN = new Gpio(17, 'out');

function ask(){
  prompt.start();
  prompt.get(['color'], function (err, result) {
  	if(err){
  	  close();
  	} else {
  	  const color = result.color.toLowerCase();
  	  handle(color);
  	}
  })
}

function handle(color){
  // make all the lights off
  switchOffAll();

  switch(color) {
  	case 'red':
  	  LED_RED.writeSync(1);
  	  break;
  	case 'yellow':
  	  LED_YELLOW.writeSync(1);
  	  break;
  	case 'green':
  	  LED_GREEN.writeSync(1);
  	  break;
  	case 'exit':
  	  exit();
  	  break;
  	default:
  	  console.log(`We don\'t have ${color} color LED`);
  }
  ask();
}

function switchOffAll() {
  // make all the lights off
  LED_RED.writeSync(0);
  LED_YELLOW.writeSync(0);
  LED_GREEN.writeSync(0);
}

function exit(){
  switchOffAll();
  LED_RED.unexport();
  LED_YELLOW.unexport();
  LED_GREEN.unexport();
  process.exit(0);
}
console.log('let the fun begin!');
ask();
The program above has a function ask, which uses the prompt module to ask the color of the light to switch on. Once it receive the input, it evaluates that using a switch case and enlight the appropriate LED.
So if the user enters red, it will switch on the red LED. However entering exit will exit the program and for any other input than the three colors and exit, it will show an error message.
Output
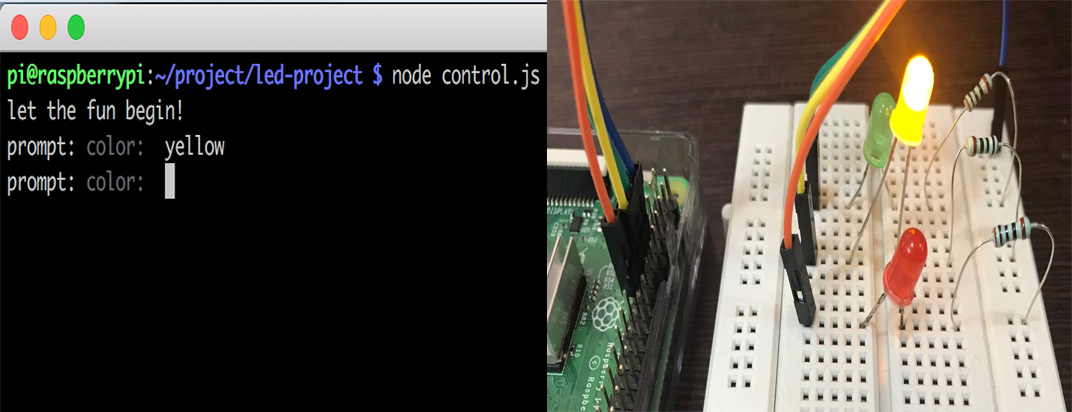 As you can see, after running the program when if we enter yellow, it is making only the yellow light on. Same will go if you enter red or green. However, if we enter
 blue, then the output will be like the following.
 You can insert
 exit anytime to make the program exit.
Conclusion
Raspberry pi, being an amazing device for IoT, not only made life easier, but also have attracted new developers in the field. We at VoidCanvas has started IoT tutorials with node.js and this article is another step to onboard our users to this field.
Today in this post, we have seen how to control LED lights with simple node.js program. In a very similar way you can also control your home lights. We will soon bring an article on the same. Till then, stay tuned and keep coding :)
SHARE THIS ARTICLE


Popular Articles
Authentication using Google's oAuth api with node.js
Thu Mar 10 2016
OAuth authentications are pretty popular now a days and another thing which is popular is JavaScript. This article shows how to plugin google’s oAuth api for authentication in your own node application.CSS3 Loader Snippet Collection: (Part 2 - Squares)
Sat Mar 01 2014
This is a continuation of my CSS3 loader snippet collection series. I've provided spinning css3 animation loader in the part 1 of this series and here in part 2, I'm providing various square type loading